The techniques used to repot Phalaenopsis orchids are significantly different from those used to repot other house plants; a fact that surprises most orchid owners the first time they repot their orchid. Some of the steps taken when repotting an orchid (removing all the potting media from the roots, for example) could have disastrous consequences if applied to repotting a typical house plant. But that’s the point: Orchids are unlike other plants you’ve owned.
To keep your orchid healthy, you’ll need to set aside preconceived notions about plant care and learn a few new skills. Happily, caring for Phalaenopsis orchids is delightfully easy. With the exception of annual repotting, these beautiful orchids require little time and effort in return for their gorgeous displays.
Annual repotting is critical to your orchid’s health. Even if it has not outgrown its pot, moth orchids should be repotted once a year with fresh, new potting media. The best time to repot orchids is immediately after they have finished blooming and blooms have fallen. Replacing your orchid’s potting media annually provides your orchid with the proper drainage and air flow it needs to grow and thrive.
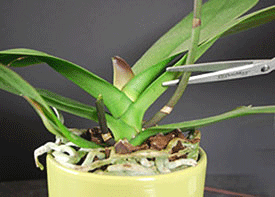
Prepare your Phalaenopsis orchid for repotting by trimming the spike. If the spike is still green and healthy, trim it one inch above the top node. Nodes occur at regular intervals along the orchid spike and appear to be covered by a tiny triangular-shaped leaf. If the orchid spike has died and turned yellow or brown, trim the spike all the way back to the potting media.
Check back to learn the next steps on repotting your orchid. In the meantime, click here to watch our orchid care video on orchid repotting.
Copyright Just Add Ice® Orchids 2023